

Como forrar botones (How to do cover buttons) 
We need buttons, the most suitable are flat buttons. Fabric , a marker to be erased with water
and scissors, needle and thread.


Colocamos el botón en el centro y tiramos del hilo, así el botón queda dentro y la tela tensa. Cosemos bien los bordes, para que quede bien sujeto y rematamos, cruzando las puntadas.

And you have finished your button, ready to be placed on the cloth. Very easy, isn´t it?One day each month, I'll post a tutorial, I hope it will be interesting and useful for you.
Have a nice day.
Hoy vamos a aprender a forrar un botón. Es muy sencillo y no lleva apenas tiempo.
Es una solución que nos puede sacar de un apuro, cuando queremos terminar una prenda y no tenemos botones apropiados, o los que hay en el mercado no nos gustan, o simplemente porque queremos personalizar nuestra ropa, incluso como un adorno para otros proyectos, como bolsos y otros complementos. Podemos utilizar la misma tela de la prenda o decorarlos con un bordado, piedritas de fantasía, etc.
Today we will learn to cover a button. It is very easy and fast to do it. It is a solution when we want finish some cloth, and we have not suitable buttons, or we can not find the appropiate button in the shops, or we do not like them, or simply because we customize our clothes, even as a garnish for other projects, such as handbags or another things . We may use the same fabric of the cloth or decorated with embroidery, fancy stones, etc..
Necesitamos, botones, los más adecuados son los planos, sin travillita. Tela para forrar, un rotulador de los que se va con agua y tijera, aguja e hilo.
We need buttons, the most suitable are flat buttons. Fabric , a marker to be erased with water
and scissors, needle and thread.
Primero, marcamos la tela, bordeando el botón, y cortamos un poco más grande de la marca. Pasamos un hilván a puntadita pequeña alrededor para luego fruncir.
First, we mark the fabric along the button, and we cut a slightly larger of the brand. We basting with little stitches around and then pucker it.
Colocamos el botón en el centro y tiramos del hilo, así el botón queda dentro y la tela tensa. Cosemos bien los bordes, para que quede bien sujeto y rematamos, cruzando las puntadas.
we put the button in the center and loosen the string, so the button is inside and the fabric taut. We stitch edges, so it will be securely attached and finish off, crossing the stitches.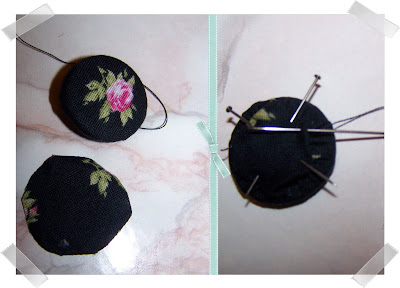 Luego, cortamos otro circulo un poquito más pequeño que el botón. Puede ser de la misma tela, si es fina, o también de forro. Lo colocamos sobre el fruncido, para que quede tapado y no se vea.
Luego, cortamos otro circulo un poquito más pequeño que el botón. Puede ser de la misma tela, si es fina, o también de forro. Lo colocamos sobre el fruncido, para que quede tapado y no se vea.Con puntada escondida vamos sujetando esta tapita, doblando los bordes hacia dentro para que quede bien rematado.
Then, cut another circle a little smaller than the button. May be of the same material, whether it is fine, or lining. We put on the pucker, and so it is hidden. We sew with hidden stitch , folding the edges inwards so that it is well finished.
Y ya teneis vuestro botón terminado, listo para colocar en la prenda. ¿A qué es muy fácil?.
Un día de cada mes iré poniendo un tutorial, espero que os resulten interesantes y útiles.
Buen día.
And you have finished your button, ready to be placed on the cloth. Very easy, isn´t it?One day each month, I'll post a tutorial, I hope it will be interesting and useful for you.
Have a nice day.
| |
__._,
__,_._,___


0 comentários:
Postar um comentário